How to configure SPF, DKIM, DMARC and BIMI security protocols?

Previously we saw how we can protect ourselves from phishing and email spoofing both as users and as a company. However, in this post we want to go deeper into the identity verification protocols that any company, organisation or entity can set up to prevent cybercriminals from impersonating a legitimate sender by impersonating them using the same domain name. We will look at how we can authenticate domains with SPF (Sender Policy Framework), DKIM (DomainKeys Identified Mail), DMARC (Domain-based Message Authentication, Reporting and Conformance) and BIMI (Brand Indicators for Message Identification).
First of all, we must be aware of the importance of having these identity verification protocols in place when we want to send email campaigns. It is not only a matter of security, it also prevents our emails from being flagged as suspicious by email analysis tools when they are sent without SPF and/or DKIM signature.
To configure the SPF, DKIM, DMARC, and BIMI authentication settings for your domain, you need to access the DNS records for your hosting account. If you can't find them or don't have access to them, your hosting provider can help you.
SPF (Sender Policy Framework)
To recap, the SPF is an authentication protocol that determines and defines who can send emails from a specific authorised domain and therefore links the domain name to an email address. In this way, if someone sends an email from a server other than the one authorised, the message will either be considered SPAM or will not be delivered. Thanks to the implementation of this protocol, we will be able to eradicate the problem and threat of email spoofing.
When setting up, there are two things to remember about SPF records:
- An SPF record is a TXT record type.
- There should only be one SPF record per domain. If you have multiple DNS SPF records, email operators will not know which one to use, which could cause authentication problems.
Check your DNS records from your hosting account. If you don't see any SPF records, create one. Otherwise, just update the existing SPF record.
How can we create an SPF record?
1- Determine the domains and IP addresses you use to send your email marketing campaigns.
2- Create an SPF record: add a TXT DNS record to your domain provider.
- The fields listed in these steps may have a different name in the settings of your domain provider. Each provider gives different names to these fields.
- Once an SPF record has been added, SPF authentication can take up to 48 hours to start working.
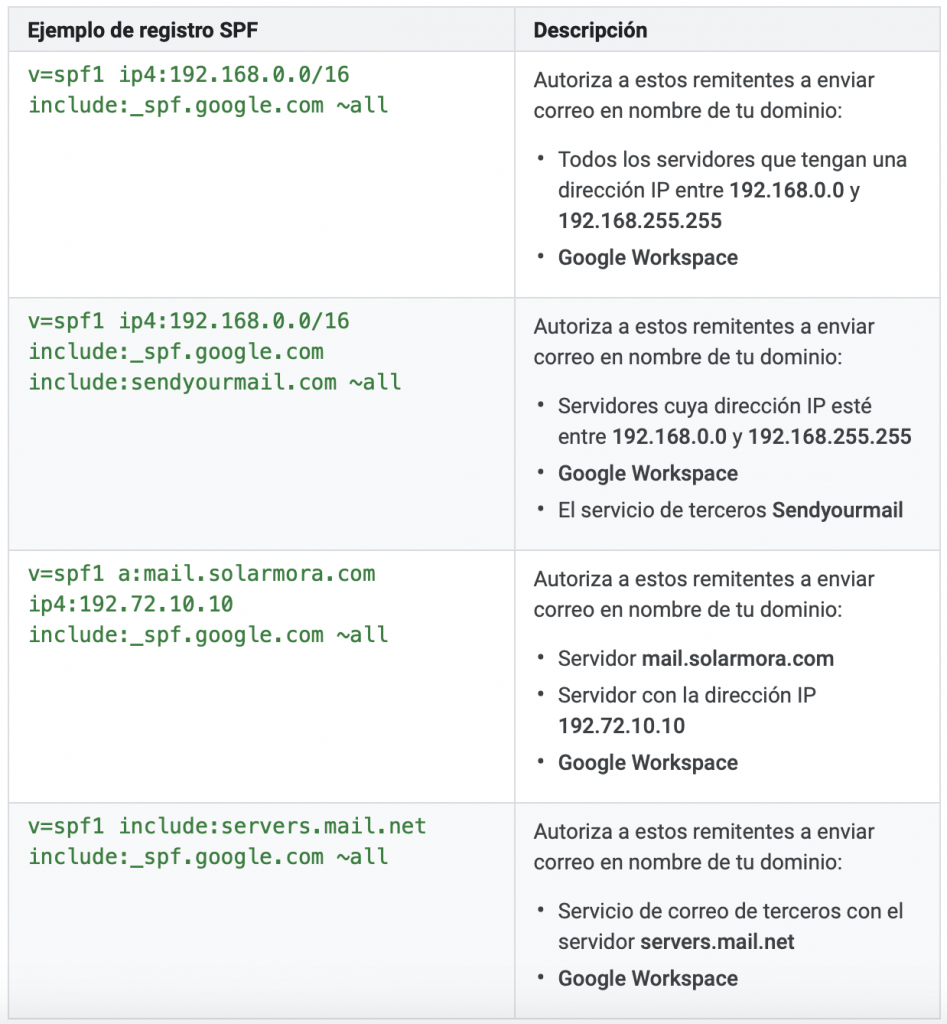
4- Insert this line of text in your SPF record in the field "value". if your organisation's emails are sent only with Google Workspace:
v=spf1 include:_spf.google.com ~all
5- Create a custom SPF record to authorise other sendersif, in addition to Google Workspace, you send mail with other servers or third-party services.
Your SPF record must include a reference to Google Workspace and the domains and IP addresses of all servers or services that send mail on behalf of your domain.
Start with this SPF record to indicate Google Workspace and then add the other senders' information:
DKIM (DomainKeys Identified Mail)
As mentioned above, the protocol DKIM is an authentication mechanism that binds a domain name to a message. When using DKIM, an encrypted signature is included in the header of all outgoing messages. The receiving e-mail servers decrypt your header using DKIM and verify that it has not been modified after sending. In this way we not only ensure that our domain is not hijacked, but also that our email message has not been modified.
In order to use DKIM authentication you must:
1- Generate the public domain key for your domain.
2- Add the public key to the DNS records of your domain. Email servers can use this key to verify the DKIM signatures of messages.
3- Activate the DKIM signature to be able to add a DKIM signature to all outgoing messages.
4- Create a new DNS record of type TXT. from your hosting account with the name and value that appear in the administrator console. Different domain registration companies use different names for the fields associated with a TXT record.
Regardless of which provider you use, enter the DNS Host name (TXT record name) text in the first field and the TXT record value text in the second field.
5- Check that DKIM signing is enabled by sending an email to someone using Gmail or Google Workspace. You cannot test the DKIM settings by sending a message to yourself. Open the message in the recipient's inbox and next to Replyclick on More Show original to view the full message header.
If in the header there is a line starting with DKIM-Signaturemeans that the DKIM signature is enabled.
DKIM-Signature: v=1; a=rsa-sha256; c=relaxed/relaxed; d=example.co.uk; s=google;
* In this fictitious example, example.en is the sending domain and google is the domain of the signature.
DMARC (Domain-based Message Authentication, Reporting and Conformance)
To summarise, DMARC is an authentication method that tells mail servers what to do when they receive a message that appears to come from a company, organisation or entity, but fails authentication checks or does not meet the authentication requirements indicated in the DMARC policy record. In this case, the unauthenticated messages could be impersonating such a company, or could be coming from unauthorised servers.
Before we start implementing the DMARC protocol, we must ensure that the DKIM and SPF records have been implemented correctly. DMARC defines the procedure to be applied in case of failure of the DKIM and SPF protocols, via a dedicated DNS record. This requires a match between the DKIM and SPF domain names and the "From" header.
DMARC will allow us to apply one of these three options, in case of a mismatch:
- None: no action, implement local policy.
- Quarantine: marked as spam.
- Reject: Reject the message.
But what are the steps for implementation?
1- If you cannot manage it yourself, contact the administrator of your company's domain name system (DNS).
2- Create a TXT record in DNS for _dmarc. [your-domain] with your DMARC record.
3- Use the following syntax in the DMARC TXT record:
v=DMARC1; p=none; fo=1; rua=mailto:your email address; ruf=your email address
- Ejemplo: v=DMARC1; p=none; fo=1; rua=mailto:ej*****@*************se.es» data-original-string=»j7v1DNPFXqlFTxa6KNr6tA==fc6vvEQeTsbPPtnLaeuzC7pn60PFltWPUygB8p2ROZV/KHGnVfV+oldyeMW9BDrlwzvNY20QIgcbHmk/MXyf+Ct/B5Sx84W5sW5VE2SnOE1ZPw=» title=»This contact has been encoded by Anti-Spam by CleanTalk. Click to decode. To finish the decoding make sure that JavaScript is enabled in your browser.; ruf=mailto:ej*****@*************se.es» data-original-string=»yJBl/3Tdlgh/RBzotV+JCg==fc6O5al/qTTSiLklS8Vhzam5tarFMkolgRmPouXF2+PQu5852GQrlkrcoDVcIGB015f» title=»This contact has been encoded by Anti-Spam by CleanTalk. Click to decode. To finish the decoding make sure that JavaScript is enabled in your browser.
BIMI (Brand Indicators for Message Identification)
BIMI is another authentication protocol that associates a brand logo with a verified email. In addition to reinforcing the brand logo, it helps to increase trust as a sender when our campaigns arrive in the inbox of our subscribers.
Like other protocols we have seen, it is a text record (txt.) that is installed in the DNS of the domain and includes the url where the brand logo is hosted in .svg format, and adds it to the authenticated emails sent.
What do we need to consider if we want to implement the BIMI protocol?
1- We need to ensure that we have a DMARC policy in place (either p=reject o p=quarantine). This demonstrates to recipients that we are proactive about the types of emails we send from our domain and that we care about our brand/company and our reputation as a reliable sender.
2- We must have a good reputation as a sender. Our practices will determine whether a recipient chooses to display our logo based on BIMI, as it depends on the email recipient (Yahoo) whether our logo is displayed or not.
3- If we meet these two strict criteria, we can apply the following txt record to our DNS and our logo should be displayed.
- Name: default._bimi.pseudo-domain
- Type: TXT
- Value: v=BIMI1; l=https://ejemplologo.svg
If it is not displayed, the problem may be related to the fact that the volume of Yahoo emails is too low and we have a neutral reputation with them. As we indicated in the previous point, the sender reputation is very important for the logo to be displayed.
It should be noted that BIMI is a relatively new protocol and has not yet been fully adopted. The only email client that supports it is Yahoo, although Gmail announced that it would be testing the technology soon.
Some of the existing limitations in the protocols
The SPF has its limitations. For example, if the email is forwarded, verification may not be carried out. This is because the address forwarding the message may not be included in the list of addresses validated by the SPF. Therefore, it is important that we are as thorough as possible when adding new addresses to our SPF record.
On the other hand, the DKIM signature will not prevent you from being considered a spammer if you don't apply good emailing practices. Therefore, it will be necessary to respect these basic rules when designing the content of your emails: pay attention to the text/image ratio, avoid the use of words identified by spam filters as dangerous, etc.
Another point to note is that SPF and DKIM do not specify what action should be taken if the verification failure. This is where the DMARC protocol comes in. tells the recipient's server how to act if the sender's authentication processes fail.